First we learned a little bit about the history of paper from HP Papermaker: History of Paper. Then we watched some videos from the TV series "How It's Made". This show is so popular in our house that it has become our thing to do on Friday evenings before the kids go to bed so I knew the kids would be captivated.
Toilet paper:
Copy Paper and Handmade Paper Part 1 (starts at 3:50), Part 2
Finally we got down to business and made our own paper. I have never done this before so first I did a lot of research. For a good basic overview I found this Arnold Grummer video helpful but as you can see we didn't use Grummer's products. Ours was very much a home made affair!
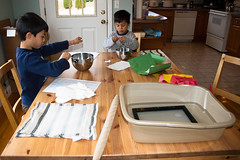
Our supplies consisted of:
- Cat litter box
- Homemade deckle*
- plastic canvas used for cross stitching
- towels
- rolling pin
- blender
- scraps of paper
- botanicals—nothing fancy, EJ chose fall leaves and pine needles, JD choose flower petals.
*I made our deckle from an inexpensive shadow box style photo frame (7.99 at Joann.com). Disassembled the thing, placed a sheet of plastic canvas (if you have it use window screen instead) and closed it back up minus the glass and backing.
The first step is to find some scrap paper and tear it into smaller pieces, about 1-2 inches. EJ chose all white, JD wanted green. Do not use old newspaper as the ink will cause your pulp to be gummy.
Tearing scrap paper into smaller bits.
We added hot water, about 1-2 cups. It turns out that more water is better than less. Blend for about 1 minute until you have a pulpy mess.
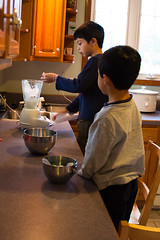
Using the blender to make the pulp.
In the cat litter box I have about 3 inches of water. Pour the pulpy mess into the box and then dip the deckle into the liquid pulp mixture. Use your hand gently stir the mixture as it stands in the deckle to help evenly distribute the pulp. I found this to be the hardest step, trying to get the pulp not too thick and not too thin. Add botanicals.
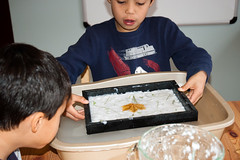
Draining the deckle with paper pulp and botanicals
After allowing it to drain for a few moments we placed a second piece of plastic screen on top and put the deckle onto a large piece of cloth. We used a hospital blanket we had, but I think dish towels would work well enough. Using a clean sponge gently daub off excess water. This also helps the fibers to lock together.

Gently sponging off excess water.
The next step is to flip the deckle over and very gently tap the bottom to release your paper, much like turning a cake out onto a dish or cooling rack. Place the paper with the plastic canvas on top onto your towel and release the paper from the canvas. Then I used waxed paper, placed it on top and using the rolling, pin rolled over the paper to squeeze out even more water. Then I transferred the finished paper to a safe place to dry.
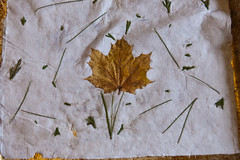
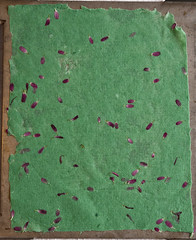
EJ's final paper!
JD's paper!
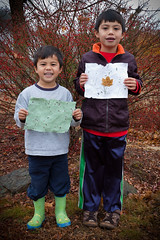
The boys showing off their dried paper.
I think we're all pretty happy with the results, but of course as the grown-up I have to mention a couple of things.
EJ's paper too heavy. We never quite got the pulp to the right consistency, I think because we used too little water. Also, his botanicals didn't really blend into the fibers well enough and are falling off. If we do this again I'll do more research for this part. I think we could have used a cornstarch and water mixture added to the pulp to help the fibers glue together with the botanicals. JD's paper came out a bit better as our second attempt. It was fun figuring out how we could gather the needed supplies without breaking the bank, some of our supplies were less than ideal but our deckle worked wonderfully! We learned a lot and the boys expressed an interest in doing this project again. I think it would be great to do in the spring when there are more living things available to use.


3 comments:
What a fun project! I wonder if the botanicals would stay better if you mushed them in a bit--with some pulp covering parts of the leaves.
Their paper looks GREAT, I'm definitely inspired to play! Great job!
Wow! Very cool and such a fun way to learn!
Great! I can't wait to try this out. :)
Post a Comment